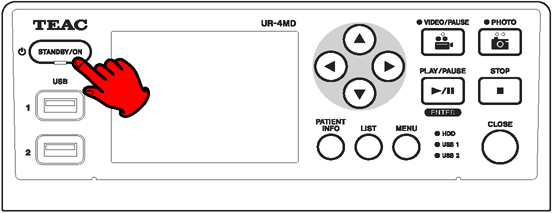
FAQ
Media
- Q : What are the recommended USB device specifications?
A : USB3.0 and 8GB or greater capacity.
- Q : What file system of an external USB device does the UR-4MD support?
A : FAT32
- Q : What is the maximum storage capacity (of the external USB device) supported by the UR-4MD?
A : 2TB (When a higher capacity storage device is connected, the capacity is recognized as 2TB.)
- Q : Is it possible to record to an external HDD?
A : Yes, it is possible but up to 2TB of space will be useable (even when a higher capacity HDD is connected) due to FAT32 format. We highly recommend to use with AC adapter, if available, to ensure proper recording operation.
- Q : How much video can be stored on 8GB/ 16GB USB devices?
A : The followings are the estimate.
8GB:
1920 x 1080 : HQ / SQ / EQ = 40min / 55min / 85min
NTSC/ PAL : HQ / SQ / EQ = 110min / 145min / 220min
16GB:
1920 x 1080 : HQ / SQ / EQ = 85min / 110min / 170min
NTSC / PAL : HQ / SQ / EQ = 210min / 285min / 430min- Q : What is the iHDD capacity and how many hours of video clips can be recorded and stored?
A : 1TB:
The followings are the estimate.
1920 x 1080 : HQ / SQ / EQ = 90hrs / 120hrs / 180hrs
NTSC / PAL : HQ / SQ / EQ = 200hrs / 270hrs / 360hrs- Q : What happens when a USB device becomes full during the recording?
A : The recording to the USB device stops, but the iHDD* recording continues for fail safe recording. The data in the iHDD is available to transfer to any USB devices later if desired.
When the USB drive is full, the LED indicator of USB1 or USB2 will be changed from Amber to Green.
*Check the available capacity of the iHDD prior to the recording.- Q : I'm getting a pop-up message asking "Are you sure you want to format?".
What should I do? A : Any non-FAT32 USB device has to be formatted to be compatible with the UR-4MD. When "Yes" is selected, the USB device will be formatted to be ready for recording.
*CAUTION : Formatting a device erases ALL existing files. Backup any necessary files on the device before execution.- Q : Can I record video and photos to SD card?
A : Yes, an SD card can be used with USB-to-SD card readers.
Note: Not all card reader is compatible with the UR-4MD.- Q : Can I use a USB optical drive such as DVD/Blu-Ray drive?
A : No. Optical drives such as USB DVD/Blu-Ray drive cannot be used.
- Q : What is S.M.A.R.T.?
A : S.M.A.R.T. (Self-Monitoring, Analysis and Reporting Technology) is a monitoring system included in computer hard drive that detects and reports on various indicators of drive reliability, with the intent of enabling the anticipation of hardware failures. The UR-4MD supports this and a user can access to the information of iHDD as well as the USB hard drive that is connected to USB1 or USB2. (USB flash memory drive is not supported).
- Q : How is S.M.A.R.T. Information accessed?
A : 1) Go to Main menu and move the cursor to "Advanced" Icon.
2) Press "ENTER" button on "Storage Device Info".
3) Use the "UP/DOWN" arrow button to select "iHDD S.M.A.R.T".
General
- Q : What video resolutions are supported?
A : 1920 x 1080 (30Hz / 29.97Hz) to 640 x 480 : Undiluted recording resolution
1921 x 1201 (Resize to 1728 x 1080) : Supported Input resolution- Q : Do I have to set up the video input and resolution on the UR-4MD?
A : No, UR-4MD automatically detects input video & audio signals, follows its resolution and configures itself to be ready for recording.
- Q : Does the UR-4MD support output to commercial HDMI TVs or HDMI monitors?
A : Yes, Connect a DVI-to-HDMI crossover cable, or an HDMI cable with a DVI-to-HDMI adapter, to the DVI connector on UR-4MD. Many subject cables and adapters are readily available and can be used with UR-4MD.
Note: HDMI audio is not supported.- Q : Is SD-SDI supported?
A : Yes, when SD-SDI signal is input, UR-4MD automatically recognizes the connection.
Note: Connect the SD-SDI output to HD-SDI connecter.- Q : How can I make a copy of a specific (patient) folder to a USB device from iHDD?
A : The followings are steps.
(1) Insert a USB device to USB1 port and press "LIST" button (Make sure "HDD" is selected as the playback media.)
(2) Use the "UP/DOWN" arrow button to choose a patient folder and press the "MENU" button.
(3) Use the "UP/DOWN" arrow button to select the copy destination and press the "ENTER" button.
(4) Press "Yes" to start the copy.- Q : Which (wireless) USB keyboard can work with the UR-4MD?
A : The following keyboards have been confirmed.
- Logitech (K520),
- iClever (IC-RF01),
- ANKER (A7723),
- INSIGNIA (NS-PNK5011),
- Microsoft Wireless 800 Desktop,
- Microsoft: Arc Keyboard (J5D-00032 / 1392 & B2M-00012/ Ergonomic KB4000)- Q : How can I print an image?
A : Printing is possible through a USB printer connected to USB 1, 2 or 3 port. Contact our sales representative to find a supported printer.
- Q : Can I use the remote control (a hand-remote / a foot-pedal) to control the UR-4MD recording?
A : Yes. Both of them are available, and separately sold from TEAC. Contact our sales representative.
- Q : Can I control and command the UR-4MD remotely from an endoscopy camera or a modality?
A : Yes. Use the EXT SW (External Trigger Switch, 3.5mm stereo mini jack) located on the rear panel. The USB 4 port can be used for the serial command communication.
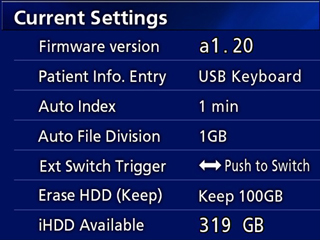
- Q : How can I find the Firmware version on the UR-4MD?
A : Go to Main menu and move the cursor to "Setup" Icon.
Press "ENTER" button while the cursor is on "Current Setting".
Recording
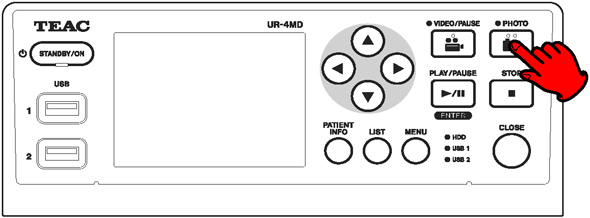
- Q : Can I capture the still images during video recording?
A : Yes. Simply press the "PHOTO" button on the front panel or the remote control anytime during a video recording.
- Q : Does the UR-4MD support the simultaneous video recording to the multiple recordable media?
A : Yes. The UR-4MD simultaneously records video clips and photos to iHDD along with the external USB drive(s).
- Q : Is 3D image recording supported?
A : Yes, with a 3D converter. 3D image (Side by side) can be captured by UR-4MD.
Contact our sales representative for more details.- Q : In what format does the UR-4MD save video clips?
A : H.264 (video format), MOV (file format)
- Q : How can I manually select the video source?
A : The followings are steps.
1) Press the "MENU" button and select "Setup" icon.
2) Move the cursor to "Video IN" and press the "ENTER" button.
3) Use the "UP/DOWN" arrow button to select the video source ("SDI", "DVI", "S-Video" or "Composite")
4) Press "ENTER" button and then the "CLOSE" button to exit menu.- Q : Is it possible to record high-definition and standard-definition images during a same recording session?
A : No, it is not possible. To change different video definition recording, press the "Close" button to end the current recording session then select/switch an input signal from Menu.
- Q : How can I turn off the On Screen Display (OSD) on an external monitor?
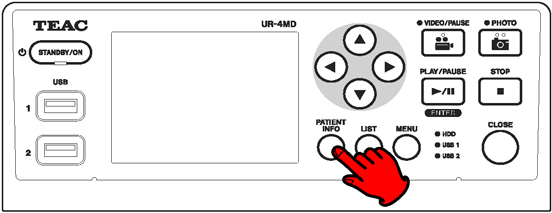
A : Press and hold "PATIENT INFO" button for a few seconds to switch and select OSD mode.
The OSD mode can also be selected from MENU → Advanced.
OSD1 : turn on (ON)
OSD2 : turn off (OFF)
OSD3 : status icons only (ICON)
OSD4 : status icons + time counters (ICON + TIMER)
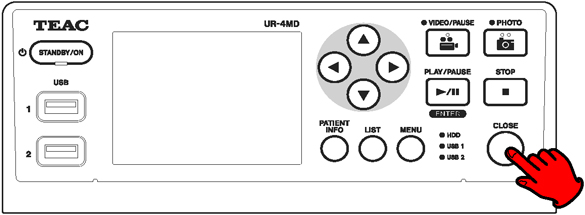
- Q : How does the "CLOSE" button work?
A : There are 3 scenarios.
(1) To end recording/playback sessions and exit menu operation or searching.
(2) To exit the current patient folder session. Note the ongoing video clips and photos are saved in the same patient folder until the "CLOSE" button is pressed.
(3) To move to the new patient folder. (Enter the patient information via USB Keyboard.)

- Q : What happens when a USB device becomes full during the recording?
A : The recording to the USB device stops, but the iHDD* recording continues for fail safe recording. The data in the iHDD is available to transfer to any USB devices later if desired.
When the USB drive is full, the LED indicator of USB1 or USB2 will be changed from Amber to Green.
*Check the available capacity of the iHDD prior to the recording.- Q : What happens when an iHDD becomes full during the recording?
A : Recording will become impossible. To avoid this, please make sure that you always have enough storage capacity available by properly setting "Erase iHDD (Keep)" mode. Go to Main Menu > Advanced > Erase iHDD (Keep) and then set to either [Keep 50GB] or [100GB] or [200GB]. OSD information indicates how many more hours/ minutes you can record.
Playback
- Q : Can I playback the photos & videos just recorded or stored on the UR-4MD?
A : Yes, you can playback the photos & videos stored on iHDD (as well as USB devices). Press PLAY button on the front panel for instant playback of the most recently recorded case, or press LIST button and search/ select the patient/ case. Then, press PLAY button for playback.
- Q : How can I switch and select the media devices for playback?
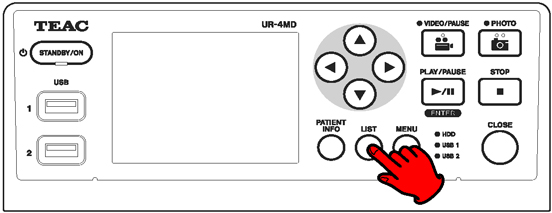
A : Press the "LIST" button and then use the left or right arrow button to change the devices for playback. ( iHDD ↔ USB 1 ↔ USB 2 ).
- Q : How can I search specific patient data?
A : 1) Press "LIST" button to show the recording data (patient folders).

2) Press "PATIENT INFO" button to show Patient Information.

3) Input ID, NAME, DOB, SEX or DATE and press "LIST" button using a USB keyboard.- Q : Is it possible to playback / edit the video file on a Mac and Windows computer?
A : Yes, MOV is an MPEG 4 video container file format used in Apple's QuickTime program and uses a proprietary compression algorithm developed by Apple to be compatible with both Macintosh and Windows platforms. On Windows systems, programs that open MOV files include QuickTime Player, Roxio Creator, CyberLink PowerDirector and PowerDVD, and Adobe Flash. Windows Media Player can also play MOV files with the addition of CODEC software.
- Q : Can I playback the video file on an Android OS/iOS?
A : Yes, save the video files on any mobile devices via a computer or an SD card. Android users may need the application software to play back.
Network
- Q : Does the UR-4MD support the back-ground file transfer to the network drive?
A : Yes, the followings are the steps.
(1) Go to Main menu and move the cursor to "Network" Icon.
(2) Press "ENTER" button on "Mode Select".
(3) Use the "UP/DOWN" arrow button to select "FTP Client" or "CIFS Client" for the file transfer.
(4) Press "ENTER" button to execute, and then "CLOSE" button to exit.
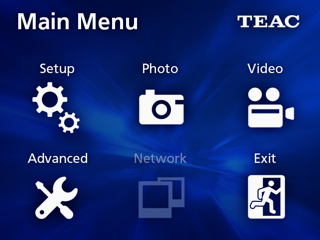
Note: we highly recommend consulting with a trained IT personnel or network administrator for network set up and configuration.- Q : The Network icon is grayed out, what does this mean?
A : The UR-4MD is non-network version. Contact our sales representative if the network function needs to be activated.
- Q : Does the UR-4MD support DICOM file format and DICOM integration?
A : Yes, contact our sales representative for more details.
Others
- Q : The STANDBY LED is not turned off even when the main power switch on the rear panel is set to OFF.
A : It is normal. The STANDBY LED stays lit for a few minutes after the main power has been turned off because of the short-term power retention function designed to secure data for sudden power outages.
- Q : The fan continues to turn even after the power button is pressed to turn off the power.
A : The unit is in the power save state. Press and hold the power button approx 1 second intending to turn off the power.
